

After playing The Tailor of Mira we’ve decided to continue adventures in the Third Horizon. I’ve decided to go straight to Emissary Lost, and anticipated that it will take us around 6-8 evenings to complete. It took 20, and was a great journey, both in game and in real life.
We’ve started on roll20 with a lot of habits that came out from live RPG’s. Covid just started, and we were all getting to know how to play online. We’ve ended using FoundryVTT + officially supported modules, and I can’t imagine moving back to roll20 or weekly live sessions.
But enough of that, let’s jump straight to the point: What ups and downs are hidden within the first volume of the Mercy of the Icons campaign.
The heroes
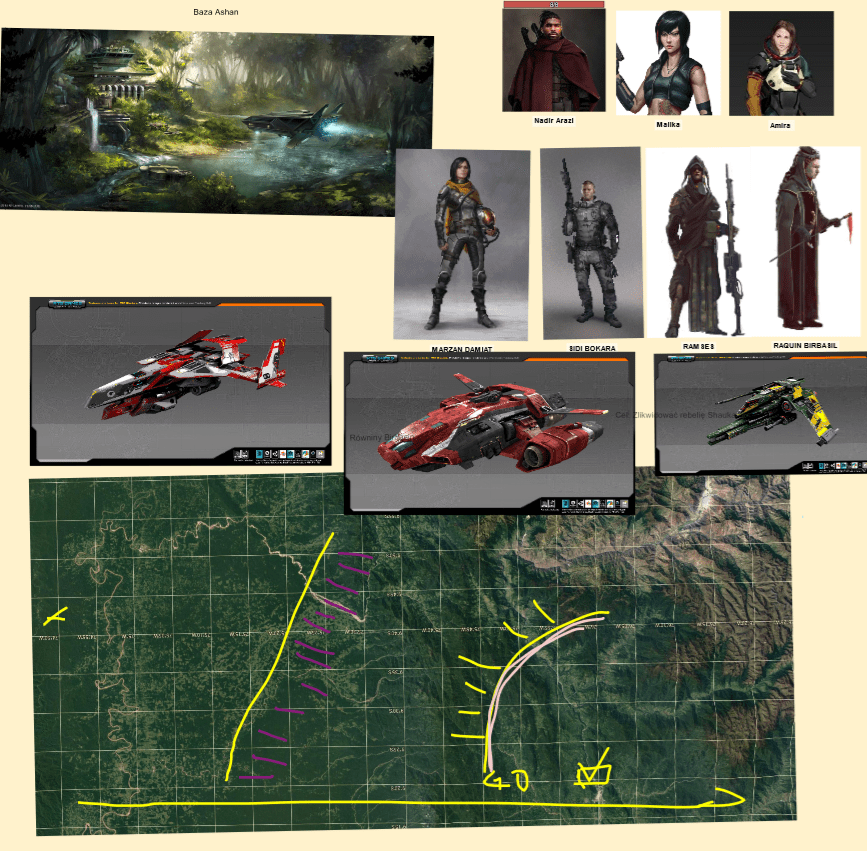
Long, long time ago, we have decided that the team will man the Scarab Light Freighter (Passenger class) called Saqr Allay. The crew of the ship is:

Aisha – Courtesan and acting Captain, Black Lotus Courtesan and a mystic. Played 6 sessions in Coriolis.

Nadir – ex Legionnaire pilot, what he lacks in empathy he makes up in brute force. Played 6 sessions in Coriolis.

Fida – engineer, originating from Little Algol. Played one session of Coriolis.

Fatma – scientist, high-born and stubborn. Played one session of Coriolis. Left the group during adventure.
Quadir – new player joining the team during the adventure. Build to fit in the scenario. Member of Coriolis Guard who was born in the lower segments of the Coriolis station.

Nazim – agent of the Special Branch, mystic, joined the team for the middle part of the adventure.
I should also mention Nilar, the Syndicate girl from the previous session. After her strike team decimated by player characters, she has approached them and asked for the position of a deckhand on their ship. Knowing her bosses would make her life short and painful, they agreed. And so Nilar became their favorite NPC, ship cat and second-pilot.
The adventure (SPOILERS)
Act One: The Mysticides
Instead of the „Last voyage of the Ghazali” I’ve used „The Tailor of Mira” as introduction to the campaign. That meant that the players didn’t have a clue why the missing of Legion warship and whole Taoan disaster is such a big fuzz. On the other hand, „The Tailor of Mira” portrays the Order of Pariah as the bad guys, which made my task of making the player believe that the Order is behind the whole scheme easier. I’ve added a small subplot to join two adventures.
At the end of the Tailor players made sure that Camisa is free of her deformations allowing for her marriage with the Zenithian nobility, pushing the Mira into Zenithians orbit of influence. That couldn’t happen according to some, so for security reasons, Camisa has travelled to Kua system with the group that saved her, while her double travelled on a luxury yacht with her father. As a cover story, the group took also a few pilgrims travelling to Xene including a Draconite agent on a mission to stop the marriage.
They were unable to fully screen the pilgrims, so they decided to put all of them into ice, until they reached the Coriolis station. Assasin hit on the footbridge from the ship to the station, critically injuring Camisa and running away. They manage to take Camisa back to the ship and perform live-saving surgery on her in medbay. Because of the attack, their ship is locked from departing the Coriolis station.
Upon reaching Coriolis, the party is asked to join their patron, doctor Wana, to be briefed on the very mission. They meet the judge, who wants to trust them with a very delicate mission. Someone is kidnapping the mystics from the station. Their goal is to investigate this and save as many of them as they can. If they succeed, they will be rewarded with a noticeable amount of Birr. The judge will also speed up the investigation on Camisa’s assault to release the ship lock. They also get a member of Coriolis Guard to help them with the investigation (Quadir joins the team). They get a lead of last missing person, Aram Yafa.
During the teatime at dr. Wana Aisha receives a vision from her long-lost friend, mystic and mentor, Hayan al-Jabi (who I use instead of Noor to connect the players to the investigation). He is on station, and he’s in danger. Someone is after him and he wants to meet in the Cantina at the Promenade.
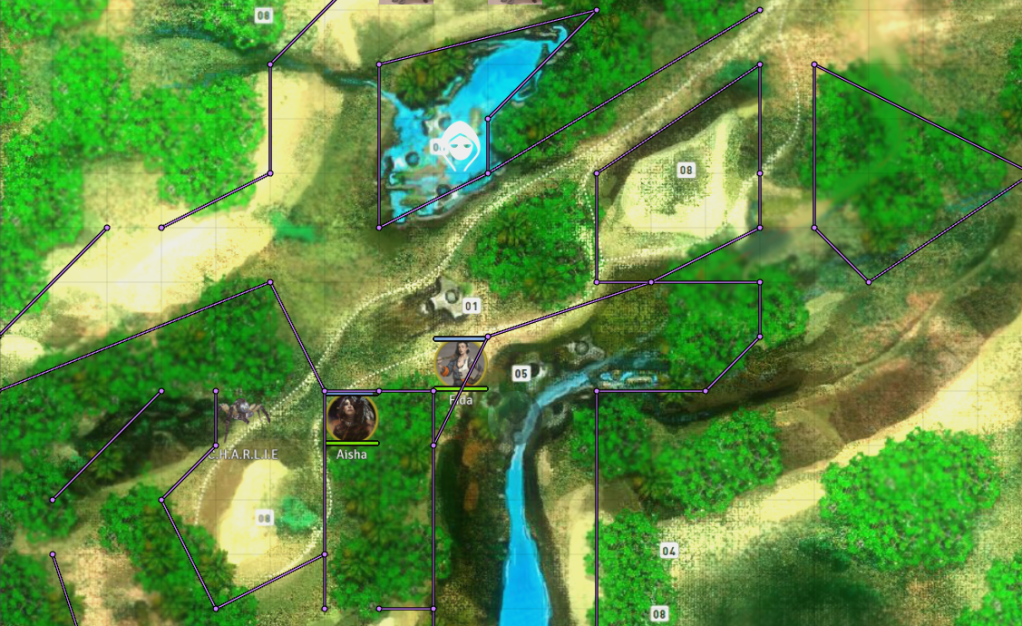
The party splits. Fida and Fatma stays on ship (skipping one game session) with Nilar, while Aisha and Nadir go to the meeting, followed by Quadir. The first encounter with fake guards does not go well. When Althea rushes into the bar, followed by fake guards, Quadir tries to blend in at all cost, Nadir gets her out and Aisha creates distraction.
The questioning of Althea changes in one big drama. Aisha admits she is a mystic, accusations are thrown against Quadir, that he is spying for Coriolis Guard, and he rages off into his room to write the report that will clear up the party from involvement in the assault on Camisa while Aisha and Nadir decide to track down her assailant who is suspected to hide in the Stevedore Central.
To spice things up, Camisa’s father is coming for her. And he is angry. He’ll be on the station within 3 days, and he wants to make sure that his daughter is well by his arrival. At the same time, the Hegemony, represented by Lenove Astir, summons them for questioning and demands that young Camisa is handled over to them. They start feeling that tracking down the assassin is the most urgent matter, but they are pressed by their patron to head out to Haian’s place and investigate the missing mystics. They learn from his neighbors that some Coriolis Guards have visited this place and find Haian’s personal communicator with Aram Yafa contact typed in. Furthermore, they call him, but the conversation goes wrong, and Aram decides to cut it and hide.
Meanwhile, the assassin manages to sneak onto their ship, leaving meeting invitation. They head there, and have a pleasant conversation, ending with mutual conclusion. The marriage between Zenithian Hegemony and Chelebs shipyards owner can’t happen. If our heroes can stop it, Camisa will be safe.
When they exit the bar, they are attacked by local thugs, coordinated by some Coriolis Guards, who flee at first gunshot. They also meet skavara and trade him something shiny in exchange for a comm that fell off one of the Guards. The unsuccessful assault on Player characters forces the Order of Pariah to speed up their plans, and rise the stakes of the game.
Act Two: High Stakes
The second act of the adventure makes the things more complicated for players. A prominent person has gone missing, and the team is tasked with tracking him down. They also want to save Camisa, and the time is running out. They need to split up and choose their tasks wise, as traveling through the station takes time.
We’ve started the session with the strange vision that all mystics on the station shared. Aisha can see a glimpse of the future and hear a strange out-worldly tune before the mother of all headaches hits her.

The team decides to close Camisa story first. Her bodyguard, Koncza was kidnapped and drugged by the (un?)friendly Draconite. The team decide to mockup a few nudes of Koncza with pictures of Camisa and seal that to the Bulletin hot-shot reporter. With a successful roll on Data Djin they manage to convince everyone that the pictures are real. The scandal blows off the planned marriage, and Camisa is sent by her father to a monastery on Mira. Koncza leaves the station before he is hit by the Camisas father wrath. His will live the life of fugitive, but the girl is saved.
Meanwhile, they are invited to the Spire for a meeting with Nigela Kurahan-Dol-Fahsra, who borrows them from Dr. Wana, their sponsor. She asks them to investigate the case of missing Emissary. The team objects, telling here that the station’s judicators or Coriolis Guards should handle this case, and they manage to get support from one of the station’s operatives – Nazim. They also get support from judicatior Akobua Kosha, who lets them into emissaries residence.
Another migraine hits team mystic while the party investigates the crime scene. They run into conclusion that all the kidnappings are organized by the same group, impersonating Coriolis Guards, but actually associated to the Order of Pariah. They try to pin down Aram Yafa again for questioning, and succeed. He further convinces them that it’s all works of the Order. All the leads point to the Sanatorium, but the players do not have any proof solid enough to call in judicators to invade it. They are convinced that if they walk in and start asking questions, they won’t be able to walk out alive. The adventure script insists that they need to speak to brother Remas, but the player’s don’t want to follow that lead. Knowing that they are after Aram, they decide to use his com to lure the fake guards into the trap. They organize meeting in 30 minutes on neutral ground. We take a short break to re-thing how to push the adventure forward.
I am sure I’ll manage to get the players to meet Remas in the Garden of Seekers (and use battlemap from the main rulebook). Players insist on meeting fake guards in another part of the station, in an environment where they have much more control. We quickly readjust the map of the garden and execute the ambush, which turns out to be the most bugged fight in the whole campaign. With RNG hating the players, festival of failed rolls, bad decisions on both sides, the combat was too long and too hard. On the positive side, Aisha has a chance to use her newly learned mystic powers (she learned telekinetic blast from Althea) and to snatch the private comm from the guard leader. They retreat to their ship, and crack the comms code, from which they learn about the evacuation order and general location of the fake guards base. (obtaining all the info they could get from Brother Remas).
Time is short, and the judge keeps pressing the crew to continue pursuit. But the morale hits the low and the team really thinks they are not the ones to fight the Order of Pariah. Fixing that was my biggest goal in act 3 of the adventure.
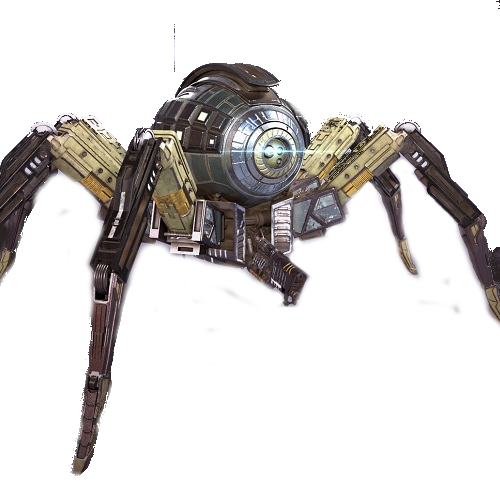
During the whole act, Fida manages to construct Charlie – her personal fighting bot that will be great comic relief in adventures ahead.
Act Three: The Abyss
The third act of the Wake of the Martyr took us three evenings to complete. Two of them followed the rulebook and one was my extra to fix the issues I had with the adventure. A lot of time was used to talk about player concerns regarding the world and the adventure. This act managed to wipe all the bad done by Act Two and helped me to overcome the scenario loopholes.
On my next session, two of the players had to cancel their session at the last moment. I took the opportunity and did something I really hate: a retrospective session from Quadirs childhood. You see, the scenario gives the players a lot of optional scenes, at the same time expecting them to feel the time pressure. And it suggests that the players will walk, while they have their own spaceship. It’s obvious that they will omit some scenes. And even those that they will play trough, you can give them some information, and you can let them experience some information. I knew that showing them the Abbys could generate continuity risk and huge rework (if they would decide to kill the Queen, or worse, die during this scenario), but we were entering Quadir’s territory and I wanted him to really lead the group through the Abyss. Giving him one-shot in that location seemed to be a good idea.
To avoid total continuum issues, the player who controlled Quadir played the younger version of himself, and the other player took over the character of Phylasia, a young smuggler working for the Sydicate, too fast to get caught (instead of the usual courtesan/capitain).
Intermission 1: Quadir’s and Phylasia fantastic adventures
Young Quadir is living on the court of Slummer Queen with his mother, in the Abbys of the Coriolis station. One day, during the daily scrap gathering, he is able to unlock a secret chamber. It is wide, and seems untouched by previous explorers. It contains a central console that is still online. After touching random buttons, he is able to open the wide hangar door and gaze into the space outside the station – the glittering Net and the planet Kua beneath it.
At the same time, Phylasia, the quickest smuggler on the Syndicate pay list, runs a mundane run from Kua to Coriolis. But she realizes she’s been set up. Two patrol crafts are approaching her ship and requesting her to turn off the engines and prepare for boarding. „Yeah suckers” is the only response they get. She tries her best to lose the tail in the Net under the station, but fails, as more and more crafts join the pursuit. She is about to lose her hope, when something unexpected happens. Old hangar door open in the lower parts of Coriolis station. She manages to hide for a few seconds in a shadow of an old bulk carrier and land in the old dock. Panicking, she launches emergency closing of the hangar door, damaging the control panel in the way. For now, she is safe, but she is locked in an unknown part of the station. She manages to find Quadir who fails at hiding, and after awkward introductions the two decides to fix the hangar door and flee the station together.
The intermission takes three hours, and tells a story of Quadir and Phylasia trying to break free from the Third Spire. During the adventure they meet the key residence of the Abbys: Barthos, Slummer Queen, nekatras and skavara. They also make a few decisions that change the shape of the location – they force the skavara market to fail and leave all of their companions for certain death, when confronted with the Beast.
The intermission is the third act of the adventure, put in reveres order. Instead, going down and buying into the grace of the Slummer Queen, they have to get a few spare parts, and get out of the Abbys, without raising suspicions. They have betrayed, double-crossed, cheated and stole whatever they needed. They have also experienced the Abbys, and learned the dangers that it presented. For the player controlling Quadir it was a great experience preparing him for the next session.
Into the Abbys
Back to the main adventure, we begin with reinforcing the low morale and giving players (false, but they didn’t know it) promise of armed support in case they run into trouble. They also receive motivation in form of a nice sum of Birr from the Judge Nigela Kurahara-dol-Fahsar for finding and bringing Emissary back alive. That’s enough to convince them to continue the adventure.
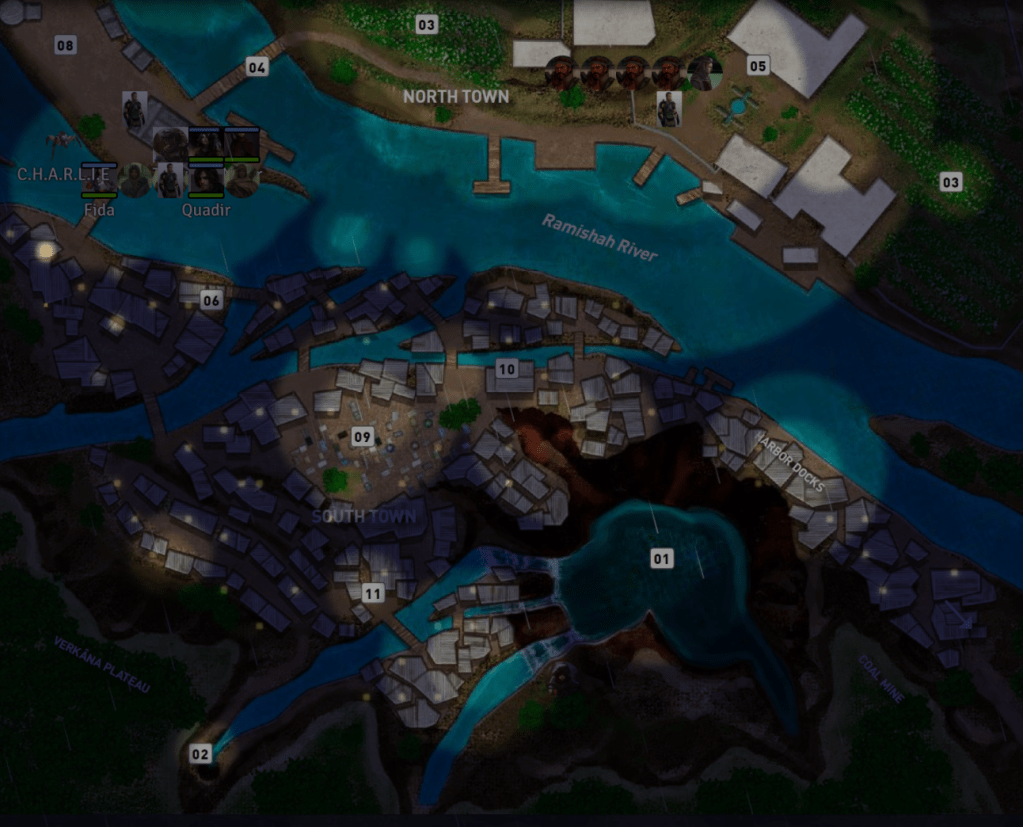
Their first plan is to use the old service elevator, controlled by Coriolis Guards, but they change their mind when Quadir confesses that he knows a safe dock in the station’s lower decks. He acts as the group’s pathfinder and guide, go straight to the Slummer Queen court. On entrance, they see the statue made of optic-fibers and lights, roughly reminding Quadir. The latter, afraid that the Queen can hold grudge against him for his last actions, is shocked when everyone is greeting him as a hero. He finds out, that the money he’s been sending over the years have been used defrauded to improve the well-being of the whole community. His actions from the past caused the end of the skavara market and forced Syndicate to move its route through the Third Spire. Life here changed from terrible, to just very, very bad. After some investigation, Quadir decides to leave his mother again in the camp, this time as the right-hand of the Slummer Queen and a hostage at the same time. It also triggers one of the „does anyone have any secrets they forgot to mention?” discussions.
Back to the main quest, the heroes strike a deal with the Slummer Queen. She will handle them a safe route to the Order of Pariah secret base if they help her with getting rid of Barthos, who’s popullarity is raising lately. They convince Barthos that they will help him to deal with The Beast once and for all, and departure into the dark corridors of The Labirynth. Once they are sure that they’re alone, they make a short and quiet (and hilarious) quarrel, who will pay respects of killing the Barthos, and they backstab him in cold blood. This event resonates in the wall and causes all lights to die. A strange cloud of pain and darkness appears. They have awakened The Beast.

The epic battle with The Beast is surprisingly short. Players use every known trick to kill it. Fida starts with the use of The Judge talent, putting the beast on stun, and giving them one round of advantage. The rest of the party causes minimal damage until Nadir performs his best attack so far:
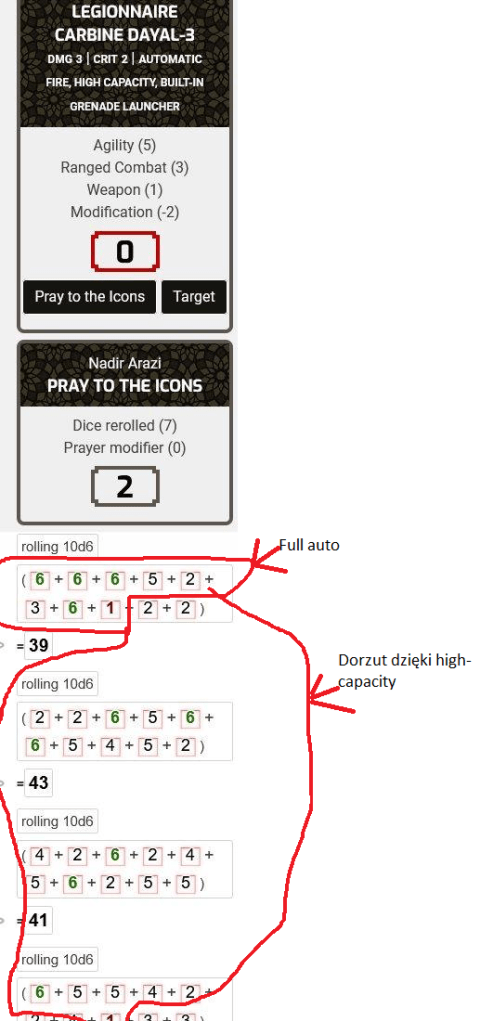
The Beast is still alive, but barely moving. It is still a powerful enemy. Other team members barely scratch it’s „armor”, but fortunately, Fida’s little helper manages to cut through and place the killing blow…
The path to the secret base is clear. Unfortunately, during the fight, one person gets injured – Judicator Akobua Koshua. Players, buffed up by killing the beast, and being sure they will have Legion’s support when needed, decide to go forward, letting Akobua return on her own.
The Secret Base
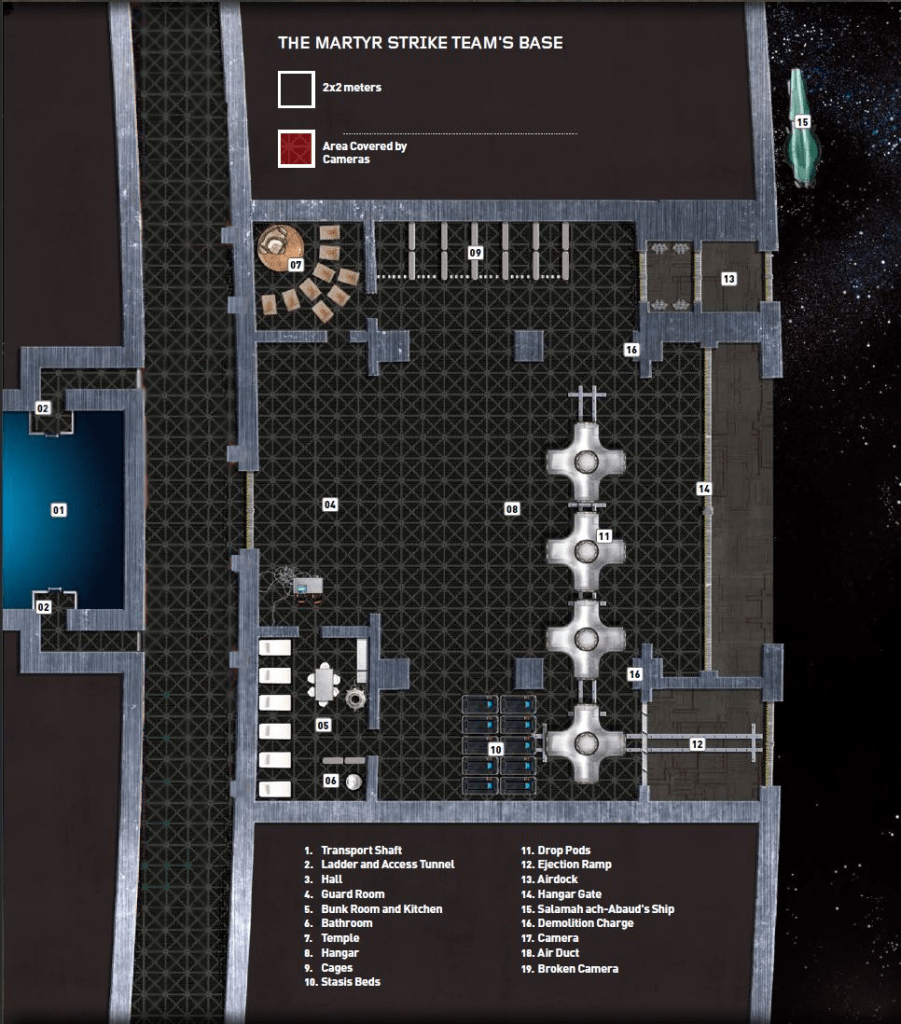
The team manages to sneak in and spot hidden cameras. They tap in to the surveillance system and learn the guard’s location and base layout. The witness capsule launch and try to contact the Legion, but some jamming device blocks their signal. Afraid they will never find the trail of The Emissary again, they decide to act fast. They take out a third of the guards quietly, but the Icons turn back to them and the regular shootout begins. After a long and challenging fight, Quadir is bleeding out, Aisha and Nadir are barely standing, and Fida and Charlie are pinned down by suppressing fire. Order of Pariah leader, seeing an inedible loss, decides to blow up the hangar door and kill everyone inside. Everyone having vacuum suit locks their helmets on and grabs to close thing possible, while the hangar contents are sucked out to the vacuum of space. Nadir manages to catch an unconscious Quadir and seal his suit, and pack him into an empty evacuation capsule that was prepared to transport the last batch of mystics. Unfortunately, they forget about the Order’s leader and his spaceship parked outside the hangar. An antimatter torpedo fired by him evaporates all evidence from the hangar and pushes the capsule in which players are hiding outside.
The capsule is half fried, but it automatically engages engines to land in the designated location on Kua. Will the thousand years old capsule survive the atmospheric entry, and allow players to survive in the jungle? We’ll never know, because Fida manages to jury-rig a small transmitter, and Aisha uses her powers to turn it on for just a second. Enough for Nilar (who was waiting in the ship outside The Third Spire) to capture it and tow the players back into safety, saving the day.
Conclusions
In general: Battle with the Beast and Order of Pariah was much harder than with the fake guards in act two. But it ran a lot smoother. Players took steps for their characters to prepare for it, and used all their Talents in their advantage.
Also, use the character’s backstory and merge it with the scenario. Use it to hook the characters in game world. Pass them information trough NPC’s they should know, and trust.
Gamemastering
The main problem of this adventure is the plot hook. Why on the station full of Coriolis Guards, Judicators, mercenaries, this specific group of adventurers is entrusted with finding of the missing people, including one of the most prominent people in the Third Horizon? One could tell that good players should follow the plot and just go for it. My players communicated openly they were clinging to Camisa plot because it felt more adequate task for their position, and carried emotional weight from the previous session. It took some time for me to accept the fact, that the side quest can be as satisfying as the main plot, and sometimes the metaplot simply has to wait and simple „there’s a arrow with a quest you need to complete” approach sometimes does not work.
This adventure is very uneven. It starts with a very broad „investigation” after which it comes to „bottleneck” that needs to happen, or the plot won’t move forward. Some of those bottlenecks feel forced, some natural, and I’ve tried as much as possible to modify the first.
Take for example The Third Spire. This fantastic location should be totally ignored. The team is working against the time, they should have a trail left by the fake guards, and they shouldn’t waste time on sightseeing. They also should have a Space Ship, and they should be able to fly the whole segment around. You need some thinking before running this act, and you need to carefully choose the locations and themes you’re willing to introduce.
I’ve also tried to make the whole story personal for the players. I’ve always been careful when using retrospective narration, but the one with Qadir worked out fantastic. It served both the player – by giving feeling that his character belongs to that place, and me – by allowing me to naturally pass the information about the cellar.
The ending of this scenario is very open. The players can fall into the trap, and loose the final fight, they can win it barely, they can evaporate the whole base and all the evidence to where the Emissary is, the leader of the Order of Pariah cell can survive, or die. There are many variables based on the outcome of this battle that should influence the way you start the next scenario. And it’s all on you fellow GM to do it, as there are no suggestions how to handle situations other than total victory against The Order of Pariah. Maybe players saved one of the mystics, who overheard what is the capsule’s destination. Or took over one of the capsules, personal tags, or any tech piece, where that information was stored? If you resist following the railroad, be prepared to fill in a lot of gaps.
After running this scenario I have realized, that some players missed the Zero session, and I could feel that they had a lot of questions regarding the role and place of their character in the game universe, that would save us the trouble if answered upfront. I’ve made a habit to re-run the Zero session once in a while, to take feedback from players and rethink my plans as we go. The second adventure was in the pipeline, so that required a few tricks… some of which worked better than others.
The scenario was clearly designed to play in the theater of mind style, and lacked few maps and handouts that work so well with any of the virtual tabletops. It has some rough edges and railroads, but still it is a great adventure, that starts to introduce players with the metaplot of the game. Just don’t rush it, and give your players a time, make sure they understand what are the motivations of their characters and use it to motivate them, and you should have a great time.
So, let’s summarize:
Cons:
- need more battlemaps!
- railroad/plot node design – player character need to do certain things in certain order to push adventure forward, without any hints of alternative solutions
- to many options that get left behind
- plot hook could be better:)
Pros:
- the plot
- arts look great
- to many options to use in one adventure 🙂
- the adventure expands the game world beyond the main rulebook, adding many locations and NPC’s to the Coriolis station
Roll20
Animated gifs were cool, but my biggest fight was not with the players or game system but with walls and lights. That made me look for roll20 alternatives and pushed us to FoundryVTT.


